Yes, you can clean a crankshaft position sensor to improve its performance and reliability. The crankshaft position sensor is an essential component in a vehicle’s engine that monitors the position and speed of the crankshaft.
Over time, the sensor can accumulate dirt and grime, leading to inaccurate readings and potential engine issues. Cleaning the sensor can remove these contaminants and restore its proper functionality. However, it is essential to follow the manufacturer’s recommendations to ensure the sensor is cleaned correctly and does not get damaged in the process.
Regular maintenance and cleaning of the crankshaft position sensor can help prevent engine problems and maintain optimal performance.
Understanding The Crankshaft Position Sensor
The process of cleaning a crankshaft position sensor is often not recommended, as it can lead to further damage. It is best to replace the sensor if it is malfunctioning to ensure proper engine performance.
What Is A Crankshaft Position Sensor:
- The crankshaft position sensor is a vital component in a vehicle’s engine management system.
- It is responsible for monitoring the position and rotational speed of the crankshaft.
- By detecting the crankshaft’s position, the sensor enables the engine control unit (ECU) to accurately calculate the ignition timing and fuel injection timing.
- The data provided by the sensor helps optimize engine performance and fuel efficiency.
Importance Of The Crankshaft Position Sensor:
- The crankshaft position sensor plays a critical role in the overall functioning of a vehicle’s engine.
- It assists in determining the precise timing of ignition and fuel injection.
- It ensures proper engine synchronization, preventing issues like misfiring and poor fuel efficiency.
- Without a properly functioning sensor, the engine may fail to start or experience performance issues.
- Regular maintenance and proper cleaning of the crankshaft position sensor can help avoid costly repairs and improve overall engine performance.
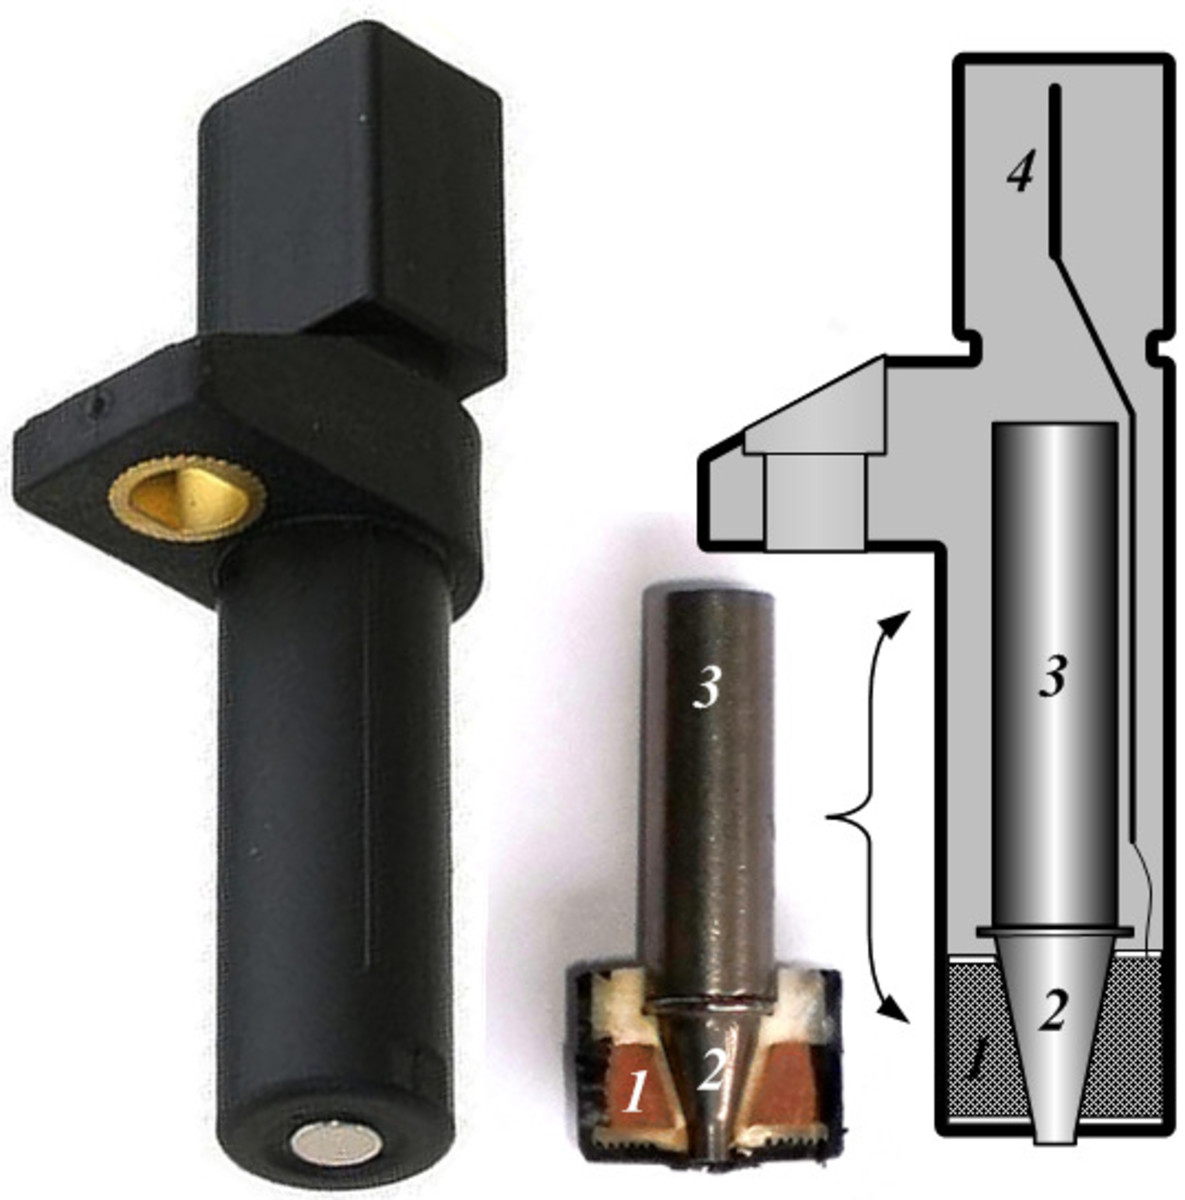
How The Crankshaft Position Sensor Works:
- The crankshaft position sensor is typically located near the crankshaft pulley or flywheel.
- It utilizes a magnet and a magnetic or Hall-effect sensor to monitor the rotation of the crankshaft.
- As the crankshaft turns, the sensor detects the changing magnetic field and generates an electrical signal.
- This signal is then sent to the ECU, which uses the data to accurately calculate ignition timing and fuel injection timing.
- The ECU can make real-time adjustments based on the information received from the crankshaft position sensor, ensuring optimal engine performance.
Cleaning the crankshaft position sensor regularly is essential to maintain its functionality. With a clean sensor, the engine control unit can accurately detect the crankshaft’s position, leading to improved ignition and fuel injection timing. So, let’s take a closer look at how you can clean the crankshaft position sensor effectively.
Signs Of A Dirty Or Faulty Crankshaft Position Sensor
The signs of a dirty or faulty crankshaft position sensor can include engine misfires, stalling, and problems with starting the vehicle. Cleaning the sensor may resolve some issues, but a faulty sensor will likely need replacement for proper functioning.
Have you been experiencing issues with your vehicle’s performance? The culprit might be a dirty or faulty crankshaft position sensor. This sensor plays a crucial role in the engine’s functionality, so keeping it clean is essential. Here are some signs that indicate the sensor may need cleaning or replacing:
- Engine stalling: If your engine frequently stalls or randomly shuts off, a dirty crankshaft position sensor could be responsible. This sensor provides important information about the position and speed of the crankshaft to the engine control module (ECM). A dirty sensor can disrupt this communication, leading to engine stalling.
- Difficulty starting the engine: A dirty sensor can also make it challenging to start your vehicle. When the crankshaft position sensor is contaminated with debris or oil, it may not accurately relay data to the ECM. This can result in prolonged cranking or a complete failure to start the engine.
- Poor acceleration: When the crankshaft position sensor is dirty, it may not provide the ECM with accurate information about the engine’s revolutions per minute (RPM). As a result, you may experience sluggish acceleration or a lack of power while driving.
- Rough idle: A dirty crankshaft position sensor can cause irregular engine idling. You may notice that the RPM fluctuates significantly or that the engine feels like it’s misfiring. This can lead to a rough and unstable idle, affecting the overall performance of your vehicle.
How To Identify If The Sensor Needs Cleaning
Now that you’re aware of the signs of a dirty or faulty crankshaft position sensor, it’s essential to know how to identify if the sensor requires cleaning:
- Check engine light: The first indication of a problem with the sensor is often the illumination of the check engine light on your vehicle’s dashboard. This light serves as a warning that the ECM has detected an issue, which could be related to the crankshaft position sensor.
- Diagnostic trouble codes: To accurately diagnose the problem, it’s best to use an OBD-II scanner. This device will retrieve diagnostic trouble codes (DTCs) from the ECM, providing specific information about the sensor’s condition. Look for codes related to the crankshaft position sensor or engine timing.
- Visual inspection: If you have access to the sensor, visually inspect it for any signs of dirt, grime, or oil buildup. A dirty sensor will likely have visible contamination, indicating the need for cleaning.
Impact Of A Dirty Sensor On Vehicle Performance
The presence of a dirty crankshaft position sensor can have a significant impact on the overall performance of your vehicle:
- Decreased fuel efficiency: A dirty sensor may not accurately provide the ECM with information about the engine’s RPM, leading to incorrect fuel delivery. This can result in decreased fuel efficiency, causing you to spend more on gas.
- Engine misfires: When the sensor fails to deliver accurate measurements, the ECM may not be able to adjust the engine’s timing properly. This can lead to engine misfires, which can be both dangerous and damaging to your vehicle.
- Increased emissions: A dirty crankshaft position sensor can affect the engine’s combustion process, resulting in increased emissions. This not only harms the environment but can also cause your vehicle to fail emissions tests.
- Potential engine damage: Ignoring a dirty or faulty crankshaft position sensor can lead to severe engine damage over time. The ECM relies on accurate data from this sensor to control various engine functions. If the wrong information is received, it can cause the engine to operate inefficiently, leading to premature wear and potential failure.
It’s crucial to pay attention to the signs of a dirty or faulty crankshaft position sensor. Regularly inspecting and cleaning this sensor can help ensure optimal engine performance, fuel efficiency, and overall vehicle reliability.
Step-By-Step Guide: Cleaning The Crankshaft Position Sensor
Learn how to clean the crankshaft position sensor with this step-by-step guide. Find out if it’s possible to clean the sensor and ensure optimal engine performance.
Preparing For The Cleaning Process:
To ensure a successful cleaning process for your crankshaft position sensor, it is important to prepare adequately. Here are the steps you need to follow before getting started:
- Park your vehicle on a flat surface and engage the parking brake to ensure stability.
- Gather all the necessary tools and materials to clean the sensor efficiently.
Tools And Materials Needed:
Before you begin cleaning the crankshaft position sensor, make sure you have the following tools and materials ready:
- Wrench or socket set: To disconnect the battery and access the sensor.
- Cleaning solvent: Use a suitable solvent that evaporates quickly and leaves no residue.
- Cleaning brush or toothbrush: Helps remove dirt and debris from the sensor.
- Compressed air: Useful for blowing away any remaining debris.
- Safety goggles and gloves: Protect yourself from potentially harmful substances.
Disconnecting The Battery:
Before proceeding with cleaning the crankshaft position sensor, it is crucial to disconnect the battery to avoid any electrical mishaps. Follow these steps:
- Locate the battery in your vehicle.
- Use a wrench or socket set to loosen the terminals and disconnect the negative (black) cable first, followed by the positive (red) cable.
- Secure the cables away from the battery to prevent accidental reconnection.
Accessing The Crankshaft Position Sensor:
To clean the crankshaft position sensor, you need to access its location in the engine compartment. Here’s how you can do it:
- Refer to your vehicle’s service or owner’s manual to identify the sensor’s location.
- Depending on the model and make of your vehicle, the sensor can be found near the crank pulley, the engine block, or the transmission bell housing.
- Use the appropriate tools to remove any components obstructing access to the sensor, such as engine covers or protective shields.
Proper Cleaning Techniques:
Once you have accessed the crankshaft position sensor, follow these steps to clean it effectively:
- Carefully disconnect the sensor from its wiring harness. Take note of its orientation for proper reinstallation later.
- Inspect the sensor for any visible dirt, oil, or debris. Use a cleaning solvent and a brush or toothbrush to gently remove the buildup.
- Take caution not to damage the delicate sensor components.
- For stubborn dirt or debris, use compressed air to blow it away, ensuring it does not get further lodged in the sensor.
Reinstalling The Sensor:
After cleaning the crankshaft position sensor, it is time to reinstall it following these steps:
- Make sure the sensor is completely dry before reinstalling it.
- Align the sensor correctly, ensuring that it fits securely in place.
- Reconnect the wiring harness to the sensor, ensuring a snug connection.
- Reinstall any components that were removed to access the sensor, such as engine covers or protective shields.
By following these step-by-step instructions, you can successfully clean your crankshaft position sensor, helping to improve its performance and prolong its lifespan. Remember to exercise caution and refer to your vehicle’s specific manual for any model-specific instructions.
Credit: axleaddict.com
When To Replace The Crankshaft Position Sensor
The crankshaft position sensor should be replaced if it becomes faulty, as cleaning it may not resolve the issue. It is recommended to consult a professional mechanic for a proper diagnosis and replacement.
The crankshaft position sensor plays a crucial role in the proper functioning of your vehicle’s engine. This sensor is responsible for monitoring the rotational speed and position of the crankshaft, which helps the engine’s control unit determine the precise timing for fuel injection and ignition.
Over time, the crankshaft position sensor may wear out or become damaged, resulting in issues with engine performance. In this section, we will discuss the factors to consider before deciding to replace the sensor, diagnostic methods for determining sensor damage, the steps to replace the sensor, and the importance of professional assistance.
Factors To Consider Before Deciding To Replace The Sensor:
- Symptoms: Pay attention to any abnormal behavior or warning signs exhibited by your vehicle. Some common symptoms of a faulty crankshaft position sensor include engine misfires, stalling, difficulty starting the engine, reduced fuel efficiency, and illuminated check engine light. It’s important to evaluate whether these issues are consistently occurring before considering a sensor replacement.
- Age and mileage: Consider the age and mileage of your vehicle. Like most mechanical components, the crankshaft position sensor may deteriorate over time due to wear and tear. If your vehicle is older or has a high mileage, it’s advisable to inspect the sensor for any signs of damage or malfunction.
- Maintenance history: Review the maintenance history of your vehicle. If regular servicing has been neglected or if there have been previous sensor-related issues, it could indicate a higher probability of sensor damage or failure.
- Other possible causes: Before jumping to conclusions about a faulty sensor, it’s important to rule out other possible causes of engine issues. Malfunctioning spark plugs, a failing fuel pump, or a problematic ignition coil can also lead to similar symptoms. Consulting a professional mechanic or using diagnostic tools can help identify the root cause accurately.
Diagnostic Methods For Determining Sensor Damage:
- OBD-II scanner: Connect an onboard diagnostic (OBD-II) scanner to your vehicle’s diagnostic port. The scanner will retrieve any fault codes stored in the vehicle’s computer system. Specific codes related to the crankshaft position sensor, such as P0335 or P0336, can indicate sensor damage or failure.
- Visual inspection: Inspect the sensor visually for any visible signs of damage, corrosion, or loose connections. Ensure that the wiring harness is properly connected and free from damage or wear.
- Multimeter testing: Use a multimeter to test the sensor’s electrical resistance and voltage output. Refer to your vehicle’s repair manual for the specific resistance and voltage range that the sensor should fall within. Deviations from the expected range can indicate sensor damage.
Steps To Replace The Sensor:
- Prepare the vehicle: Ensure the vehicle is parked on a level surface, the engine is turned off, and the ignition key is removed.
- Locate the sensor: Refer to your vehicle’s repair manual to identify the precise location of the crankshaft position sensor. In most vehicles, it is typically positioned near the crankshaft pulley or flywheel.
- Disconnect the sensor: Disconnect the electrical connector that attaches the sensor to the wiring harness. Carefully remove any retaining bolts or clips that secure the sensor in place.
- Remove the old sensor: Gently twist and pull the sensor to remove it from its mounting location. Take note of the sensor’s orientation for proper installation of the new sensor.
- Install the new sensor: Align the new sensor with the mounting location, ensuring it is positioned correctly. Insert it firmly and secure it with the retaining bolts or clips.
- Reconnect the sensor: Attach the electrical connector to the new sensor, ensuring a proper connection with the wiring harness.
- Reassemble and test: Reassemble any components that were removed during the process. Once everything is in place, start the engine and check for any remaining symptoms. Use an OBD-II scanner to ensure that no fault codes related to the sensor are present.
Importance Of Professional Assistance:
While replacing a crankshaft position sensor can be a relatively straightforward task for experienced DIY mechanics, it is essential to highlight the importance of professional assistance in certain situations. Here are a few reasons why seeking professional help may be beneficial:
- Expertise and specialized tools: Professional mechanics have the knowledge, experience, and specialized tools required to accurately diagnose and replace the crankshaft position sensor. They can ensure that the installation is done correctly and quickly.
- Identifying underlying issues: A professional mechanic can thoroughly inspect the vehicle and identify any underlying issues that may have contributed to the sensor’s failure. This can help prevent future problems and save you from unnecessary sensor replacements.
- Warranty considerations: In some cases, replacing the crankshaft position sensor may be covered under a warranty. Professional assistance ensures that the replacement is carried out within warranty guidelines, protecting your investment.
Remember, if you are uncertain about your mechanical skills or lack the necessary tools and knowledge, it is always recommended to consult a professional mechanic for assistance.
Preventive Maintenance For The Crankshaft Position Sensor
Regular preventive maintenance is crucial for the proper functioning of the crankshaft position sensor. However, cleaning the sensor is not recommended as it may cause further damage.
Regular inspections and cleanings:
- Regularly inspecting and cleaning the crankshaft position sensor is an essential part of preventive maintenance for your vehicle.
- This sensor plays a crucial role in the engine’s operation, so keeping it clean can prevent potential issues and ensure optimal performance.
Tips for keeping the sensor clean:
- Avoid using harsh chemicals or excessive force while cleaning the sensor to prevent damage.
- Gently wipe the sensor using a soft, lint-free cloth to remove any dirt, dust, or oil buildup.
- If the sensor is heavily soiled or has stubborn deposits, use an electronic contact cleaner or sensor-specific cleaning solution recommended by the manufacturer.
- Be careful not to touch or damage any other components surrounding the sensor during the cleaning process.
Importance of following the manufacturer’s guidelines:
- Each vehicle and sensor may have specific guidelines for inspection and cleaning, so it’s crucial to consult the manufacturer’s recommendations.
- Following these guidelines ensures that you perform the maintenance correctly and avoid any potential issues that could arise from improper cleaning techniques.
- Manufacturers often provide valuable insights into how frequently the sensor should be inspected and cleaned, helping you establish a regular maintenance routine.
Remember, regular inspections and cleanings, along with adherence to manufacturer guidelines, play a vital role in keeping your crankshaft position sensor clean and functioning optimally. By incorporating these preventive measures into your vehicle maintenance routine, you can help prolong the sensor’s lifespan and ensure the smooth operation of your engine.
Frequently Asked Questions Of Can You Clean Crankshaft Position Sensor
Can You Clean A Crankshaft Position Sensor?
Yes, you can clean a crankshaft position sensor, but it’s recommended to replace it. Cleaning may temporarily fix the issue, but the sensor could malfunction again. It’s better to invest in a new sensor to ensure accurate readings and avoid potential engine problems.
Why Should I Clean My Crankshaft Position Sensor?
Cleaning the crankshaft position sensor can help remove dirt and debris buildup, which can affect its performance. A clean sensor ensures accurate readings of the crankshaft’s position, enabling the engine control unit to make proper adjustments for ignition timing and fuel injection, leading to smooth engine operation.
How Often Should I Clean My Crankshaft Position Sensor?
Cleaning the crankshaft position sensor is not part of regular vehicle maintenance. It is only recommended if the sensor becomes dirty or contaminated. If you experience engine performance issues, such as misfires or trouble starting, it’s worth checking and cleaning the sensor to eliminate it as a potential cause.
Conclusion
To sum up, cleaning the crankshaft position sensor is a task that can help fix certain issues with your vehicle’s engine. Regular maintenance of this component is essential for optimal engine performance and longevity. By following the proper cleaning process and using the right tools, you can remove dirt and debris that may interfere with the sensor’s functionality.
Furthermore, cleaning the sensor is a more affordable option compared to replacing it entirely. However, it’s crucial to note that not all crankshaft position sensors can be cleaned, as some may need to be replaced instead. Therefore, it is always recommended to consult your vehicle’s manual or seek professional advice before proceeding with any cleaning or repair.
Remember, taking care of your vehicle’s components will contribute to its overall health and ensure a smoother driving experience.